WordPress Google Analytics plugin comes packed with many user-friendly settings. They allow you to personalize the way your website is tracked or Google Analytics reports are built.
To begin configuring these options, navigate to Analytics > Settings page from WordPress administrative dashboard of your website. This page consists of the following tabs:
- Authenticate,
- Tracking,
- Filters,
- Advanced.
Click on the tabs to access corresponding tools and start setting up Google Analytics Settings.
Authenticating Google Analytics account.
You can authenticate or reauthenticate your Google Analytics account in this section of Settings page. You will see a popup containing your Google accounts after clicking on Authenticate/Reauthenticate button.
Select the account you’d like to connect with the plugin and permit Google Analytics plugin to access your public profile. Then copy the authentication code and paste it in the input, which will appear under Authenticate button.
It is also possible to reauthenticate, in case an account is already connected to your Google Analytics WD plugin, and you would like to change it.

Tracking Settings
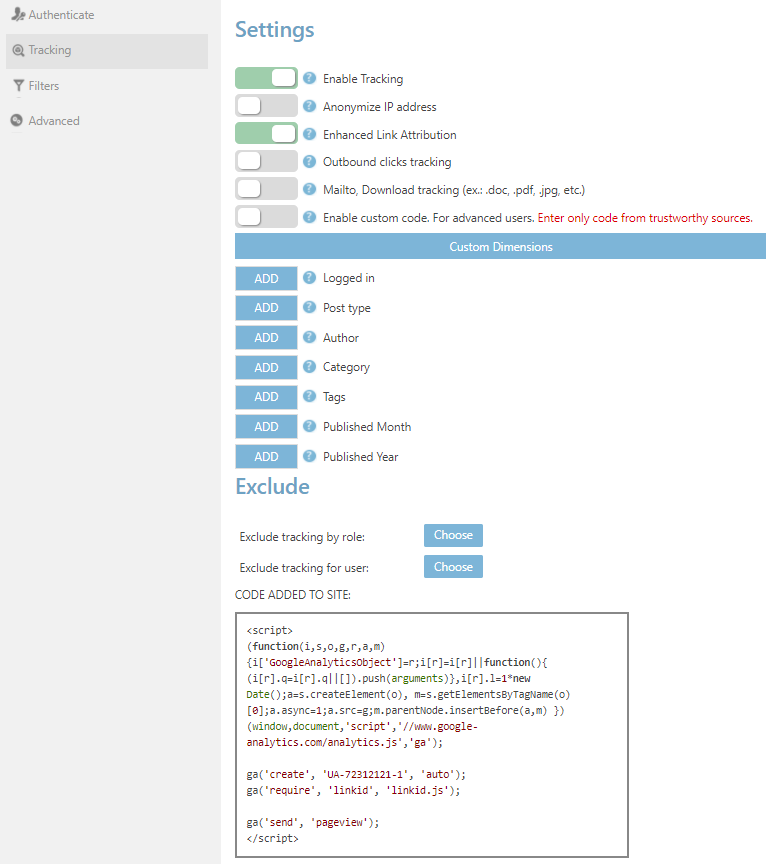
You can have full control over Tracking settings by enabling or disabling options of this tab. When Enable Tracking option is turned on, the WordPress Google Analytics plugin adds Google Analytics tracking code to your website.
Note: The tracking code will be added in case the domain of your current website is associated with a Google Analytics account. The full demo script will appear at the bottom of Tracking tab.
The following options are available in Tracking Settings:
- Anonymize IP address. If this option is enabled, the last digits of users’ IP addresses will be hidden. Their full IP will not be visible, and thus the visitors will be anonymized.
- Enhanced Link Attribution. Turn on this option to track multiple links with the same destination. Get information for buttons, menus, as well as elements with multiple destinations, e.g. search boxes. More information about Enhanced Link Attribution can be found here.
- Outbound clicks tracking. Records the links which visitors have clicked to exit from your website.
- Mailto, Download tracking file formats: .doc, .pdf, .xls, etc. Enable this option to track file downloads from your website and clicks on mailing links.
- Enable custom code. Activate this option to add a custom script to Google Analytics tracking code. Make sure to enter the code from trustworthy sources only.
Tracking Custom Dimensions
Besides the default dimensions provided by Google Analytics, you can also configure and track Custom Dimensions. They can be handy when you want to analyze specific data, which Google Analytics does not track automatically.
Google Analytics WD plugin provides the following 7 options of Custom Dimensions for WordPress sites:
- Logged in,
- Post type,
- Author,
- Category,
- Tags,
- Published Month,
- Published Year.
Click on Add button next to each custom dimension to let Google Analytics begin tracking. Custom Dimensions tracking can be enabled or disabled with these options any time.
For example, when you enable Logged in custom dimension, Google Analytics will provide tracking report particularly based on users, who are logged in to your website.
Using these custom dimensions you can find the most read author by your website visitors, the most popular category posts, and more.
Tracking Exclusions
With Google Analytics plugin, you can set exclusions by user types and certain users the following options:
- Exclude tracking by role,
- Exclude tracking for user.
Press Choose button and select the user types or users, the activity of which you would like to exclude from Google Analytics tracking. Any interactions with your website by these users will be ignored when evaluating reports.
Note, that these exclusions are set locally on your website by Google Analytics plugin. In case these tracking exclusions are set, WordPress Google Analytics plugin detects the specified user or role, and does not apply tracking script.
Google Analytics Filters
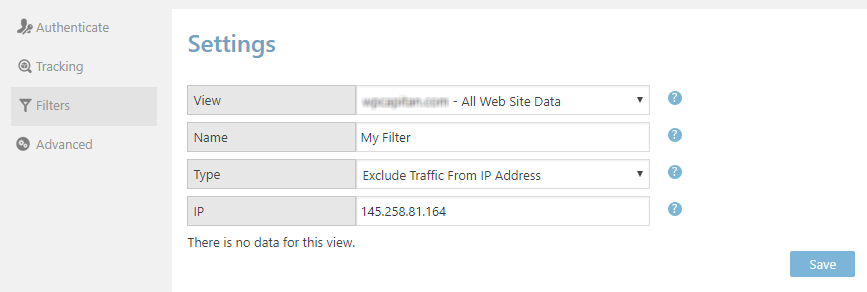
You can also exclude specific locations or IP addresses from Google Analytics reports, you can use Filtersfeature of the WordPress Google Analytics plugin.
To configure filters, select the tracking site first. Afterwards, write a Name for it and choose its Type, which can be one of the following:
- Exclude Traffic From IP Address,
- Exclude Traffic From Country,
- Exclude Traffic From Region,
- Exclude Traffic From City.
Each of these options has their text input for the corresponding value. For example, if you select Exclude Traffic From IP Address option, IP input field will appear, where you can provide the IP address, which you’d like to filter from your Google Analytics WD reports.
You can add several IP and location-based exclusions, the list of which will be saved under Filters tab of Settings page.
Unlike Exclusions, Google Analytics Filters are added to your Google Analytics account, and the corresponding tracking informarion is excluded based on configurations described above.
Advanced Settings
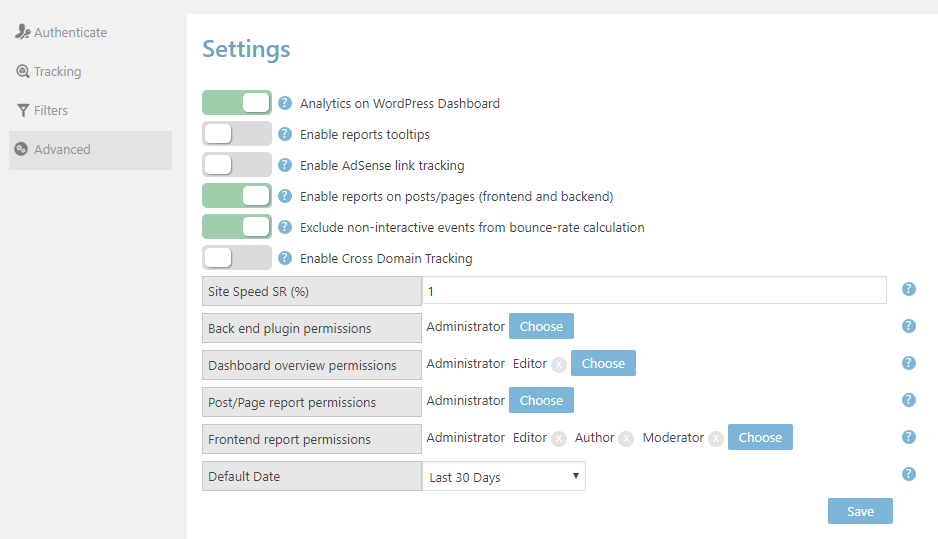
The group of settings under Advanced tab provides options to enlarge the basis of your reports, select user permissions, and more. You can configure the settings listed below and customize Google Analytics tracking further.
- Analytics on WordPress Dashboard. Enable this option to display Google Analytics overview report on WordPress administrative dashboard.
- Enable reports tooltips. Turn this option on to display help texts for Google Analytics WD reports.
- Enable AdSense link tracking. You can include your Google AdSense reports to Google Analytics WD reports page by turning this option on.
- Enable reports on posts/pages (frontend and backend). Adds buttons to pages/posts list and site frontend, as well as under page/post metabox in editor. Clicking one will open a popup window containing comprehensive statistics of that specific page or post.
- Exclude non-interaction events from bounce-rate calculation. If this setting is turned on, non-interaction events will be filtered when calculating bounce-rate. Watching a video, for example, is a non-interaction event, whereas posting a comment is interactive. You can find out more about non-interaction events here.
- Enable Cross Domain Tracking. You can let Google Analytics track similar activities on two related websites as a single session by turning Cross Domain Tracking on. Further information about Cross Domain tracking can be found within this link.
Provide Cross Domains separated by commas, making sure to use the following format:
http://example.com, http://yourdomain.com
- Site Speed SR (%). Google Analytics tracks loading speed of your website to build a report based on site speed. Instead of evaluating all user activity for this purpose, it looks up among a certain percentage of visiting users. You can determine this percentage with this option.
User Permissions
You can choose the user groups, which have full access to Google Analytics options and reports. Use the following settings in Advanced tab to configure access permissions.
- Back end plugin permissions. Press Choose button to select user roles and permit access to Google Analytics plugin. Only Administrator users can view the plugin by default.
- Dashboard overview permissions. Select all user roles, which will have access to view Google Analytics report on WordPress Dashboard.
- Post/Page report permissions. Mark all user roles, which will be able to view reports of separate pages/posts from frontend and WordPress dashboard of your website.
- Frontend report permissions. Choose all user roles to let them display frontend reports of Google Analytics tracking.
- Default Date. Use this option to set an initial value for date range on Reports page, Analytics Dashboard,as well as page, post and frontend statistics popups. It can be changed later with Date Range option.
v.1.2.0