Google Analytics is the most popular web analytics tool out there. It reports all kinds of data regarding the traffic, performance, and revenue of your blog.
Whatever your goal is — a certain number of visitors from a certain demographic or revenue you want to make with your ads — you can track it all with this tool.
At 10Web, we wanted to see and manage these metrics more conveniently. We developed a Google Analytics WordPress plugin that displays the reports right on the WP dashboard, allowing to customize and prioritize the ones that we check every day.
The plugin also emails you the reports or sends push notifications whenever you want. We’ve added some extra features like managing WP user permissions and excluding specific users/pages from the statistics.
Now let’s see how you set up and manage the plugin (which is, by the way, a certified member of the Google Analytics Technology Partners Program).
1. Install the plugin
This is how you start using any plugin.
If you are installing a plugin for the first time, we’ve written a detailed guide on installing WordPress plugins for you.
2. Authenticate
After activating the plugin, you will have to connect to your Analytics account. First of all, locate the plugin on your WP dashboard menu bar. Click it go to the plugin tab.
If you already have an account, click “AUTHENTICATE” to sign in to Google from the dashboard.


When you successfully sign in, Google will give you an authentication code. Just paste it in this field.


In case you don’t have configured a GA account, you’ll have to add a new “property” to your Google account.
As it is a part of your website, the Google Analytics plugin adds the property automatically which is much easier than through the Google Analytics website.
Just go to “Settings” and the plugin will suggest you to CREATE an Analytics account.
After you click the button, you’re redirected to Google.

Fill out the form, press SAVE, then come back to the dashboard.

Click REFRESH and you’re all set. Now start using the plugin at its best.


3. Set up goals
Now you have your website fully connected to the Analytics plugin. For every blog, it’s important to have certain goals and track them constantly. With the Google Analytics plugin, you can set goals to see how you get those results.
Let’s say your goal is to build a subscription base for your blog. So you have a subscription form embedded into your posts.
Now, to track those subscriptions via the Google Analytics plugin, you just have to set up your goals.
The types of goals are:
- Destination (when users visit a specific page);
- Duration (how much time a user spends on the website);
- Pages/screens per session (how many pages a user opens before closing your website).
When you aim for more subscribers, “destination” is most probably the right goal type for you. After a user subscribes, redirect them to a page that says, for example, “Congratulations! You are now subscribed.”
Then go to “Analytics” > “Goal Management“, and add the URL of the “Congratulations” page as your target destination.
Every time a user sees this page, you’ll know you have another subscriber. This is the same way some e-commerce websites track purchases: they just track the purchase confirmation pages.

With the main goals set, you can keep following all kinds of detailed data to track and improve your website performance day by day. Give your goal a name and monitor it in the “Reports” section of the Analytics plugin.
4. Prioritize and monitor your reports
Metrics to check Daily:
These are the basics of your performance metrics.
- Overall sessions count

- Unique users count

- Bounce rate

Check these reports constantly and keep in mind that unexpected changes may also alert you that there’s something going on with your blog’s technical performance.
The weekly and monthly metrics change more smoothly than the daily ones. They will guide you to constantly adapt your strategy.
Metrics to check Weekly:
The Google Analytics plugin tracks the average user:
- Behavior

- Traffic sources

- E-commerce purchases

Check these metrics and improve them weekly: these are the parts on which your weekly marketing activities depend.
Metrics to check Monthly:
A monthly check is quite enough when you’re looking at the data about your
- Demographics

- Interests

- Geolocation

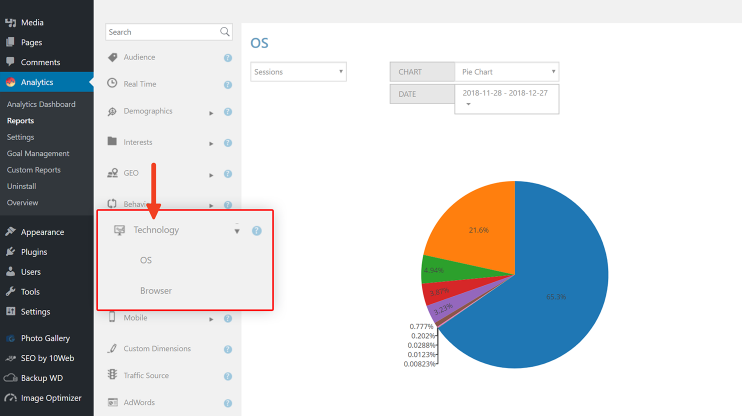
- Technologies

And if there’s something you want to check right away, the plugin will display the real-time metrics.
You can also set up custom reports for much more detailed metrics, such as specific keywords in organic search, specific types of users or activity on a specific landing page.
5. Set up alerts and notifications*
So you have set your priorities among the metrics and know how often you’re going to check each.
But you don’t want to come back to the dashboard every time just to check one specific metric, do you? That’s why the Google Analytics plugin is designed to send you regular notifications and alert you once you reach a metric you had set.
The push notifications are available on iOS, Android and Desktop applications. Download the Pushover app and set up the notifications in the Settings section.
To setup emails, go to Settings -> Emails and set up the report types and frequency.
6. Export reports or receive them via email*
You can export any report in PDF or CSV. Just hover over the Export button in the report page.
The plugin gives you the option to either download the report or send it via email. The emails are customizable: you enter the receiver’s address, email subject and add anything you want to the email copy.
Send the email to your own address, your partners and advertisers.
The email customization options work for regular emails equally.
* Notifications and exported reports are temporarily unavailable. We’ll update once they are back.
Originally published at https://10web.io/blog/how-to-set-up-and-use-google-analytics-for-a-wordpress-blog/ on December 27, 2018.